
Imagine you’re driving down a deserted road, enjoying the solitude and the hum of the engine.
Suddenly, you feel a strange vibration, and your heart sinks as you realize you have a flat tire.
Panic may start to set in, but fear not! In this step-by-step guide, we will walk you through the process of fixing a flat tire, ensuring you can get back on the road safely and with confidence.
So, buckle up and let’s get started on this essential skill that every driver should know.
Assess the Damage
To properly assess the damage to your tire, carefully inspect the entire surface for any visible signs of punctures, cuts, or bulges. Start by visually examining the tread area, looking for any foreign objects like nails or screws embedded in the rubber. Run your hand over the tread to feel for any irregularities or sharp objects that may have caused a puncture.
Next, check the sidewalls for any cuts or tears that could compromise the structural integrity of the tire. Be sure to also examine the inner wall of the tire, as damage may not always be visible from the outside. Look for any bulges or bubbles, which could indicate a weak spot in the tire that’s at risk of a blowout.
Additionally, pay attention to any unusual wear patterns on the tread, as this could be a sign of misalignment or other issues.
Gather the Necessary Tools
You’ll need a few essential tools to effectively repair your tire in an emergency situation. Gathering these tools beforehand will ensure that you’re prepared and can quickly fix your flat tire when needed.
The first tool you’ll need is a spare tire. Make sure it’s properly inflated and in good condition.
A lug wrench is another crucial tool that will help you remove the lug nuts holding the flat tire in place.
Additionally, a jack is necessary to lift your vehicle off the ground, providing the necessary clearance to remove the damaged tire and replace it with the spare.
A flashlight is also recommended, as emergencies can happen at any time, including during the night. It will help you see what you’re doing and make the repair process easier.
Lastly, keep a tire pressure gauge handy to check the pressure of your spare tire and ensure it’s ready to use.
With these essential tools, you’ll be well-equipped to handle a flat tire emergency.
Remove the Flat Tire
Now that you have gathered the necessary tools, it’s time to proceed with removing the flat tire.
First, locate the lug nuts on the flat tire. These are the nuts that hold the tire in place on the wheel. Use a lug wrench to loosen the lug nuts, turning them counterclockwise. Remember, lefty loosey, righty tighty. Don’t remove the lug nuts completely just yet, as you want to keep the tire in place until you’re ready to lift it off.
Next, locate the jack points on your vehicle. These are usually designated by small notches or grooves on the frame. Place the jack under one of these points and begin raising the vehicle. Use the jack handle or a wrench to turn the jack screw clockwise, lifting the vehicle off the ground. Make sure the jack is secure and stable before continuing.
Once the vehicle is lifted, it’s time to fully remove the lug nuts. Use the lug wrench to turn them counterclockwise until they’re loose enough to remove by hand. Set the lug nuts aside in a safe place, as you’ll need them when installing the spare tire.
With the lug nuts removed, carefully lift the flat tire off the wheel studs. Place it aside and prepare to install the spare tire.
Congratulations! You have successfully removed the flat tire and are one step closer to getting back on the road.
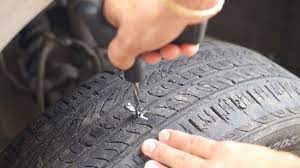
Repair the Puncture
To repair the puncture, grab the tire repair kit and locate the source of the leak. Begin by removing any debris or foreign objects from the tire. This will ensure a clean and smooth surface for the repair process.
Next, use the reamer tool from the repair kit to enlarge the puncture hole slightly. Insert the reamer into the hole and twist it back and forth to widen the opening. This will help the repair plug fit securely into the puncture.
Once the hole is widened, take one of the repair plugs from the kit and thread it onto the insertion tool. Apply a generous amount of rubber cement to the plug, coating it completely. Then, carefully insert the plug into the puncture hole, making sure it goes all the way through. Slowly pull out the insertion tool, leaving the plug inside the tire.
To ensure a proper seal, trim the excess plug sticking out of the tire using a sharp knife or scissors. Be careful not to cut too close to the surface of the tire, as this could damage the plug.
Reinstall the Repaired Tire
After successfully repairing the puncture in your tire, it’s time to reinstall the tire onto your vehicle.
First, line up the lug bolts on the wheel with the corresponding holes on the hub of your vehicle. Make sure the tire is aligned properly and push it onto the hub until it fits snugly.
Once the tire is in place, screw on the lug nuts by hand to secure the tire. Use a wrench to tighten the lug nuts as much as possible, but be careful not to over-tighten them.
It’s important to tighten the lug nuts in a star pattern to ensure even pressure distribution. Once all the lug nuts are securely tightened, lower the vehicle back onto the ground.
Finally, use the wrench to fully tighten the lug nuts in the star pattern. Give each nut a final tighten to ensure they’re secure.
Congratulations, you have successfully reinstalled your repaired tire and can now continue your journey with peace of mind.
Conclusion
In conclusion, fixing a flat tire can be a simple and straightforward process if you follow the necessary steps.
By assessing the damage, gathering the necessary tools, removing the flat tire, repairing the puncture, and reinstalling the repaired tire, you can quickly get back on the road.
Remember to always have the required tools and a spare tire in your vehicle for emergencies.
With a little practice, you’ll be able to handle this common roadside issue with ease.